Table of Contents
From last few years, we have seen lots of image styling apps are available in android and app store market. But in this article, we will build our own flask based web app which not only do image styling but also cartoonify the image.
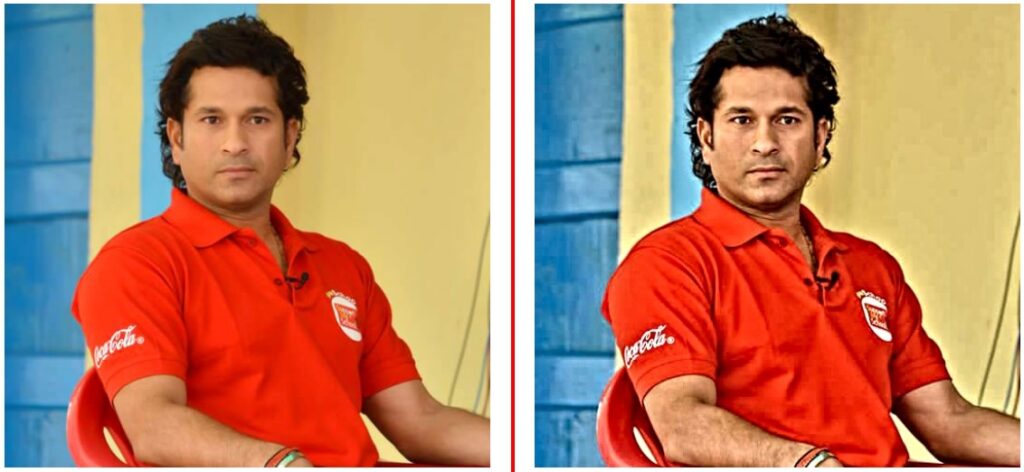
So for styling the images we will be using filters defined in OpenCV. So first filter we will be using is detail enhancing filter. This filter enhances the finer details of the image and the image looks more sharper in comparison to original image.
1. Detail Enhancing Filter
The code for using detail enhancing filter using opencv is given below:
import cv2
img = cv2.imread('image1.jpg')
dst = cv2.detailEnhance(img, sigma_s=10, sigma_r=0.15)
Parameters description is given below:
Parameters
| src | Input 8-bit 3-channel image. |
| dst | Output image with the same size and type as src. |
| sigma_s | Range between 0 to 200. |
| sigma_r | Range between 0 to 1. |
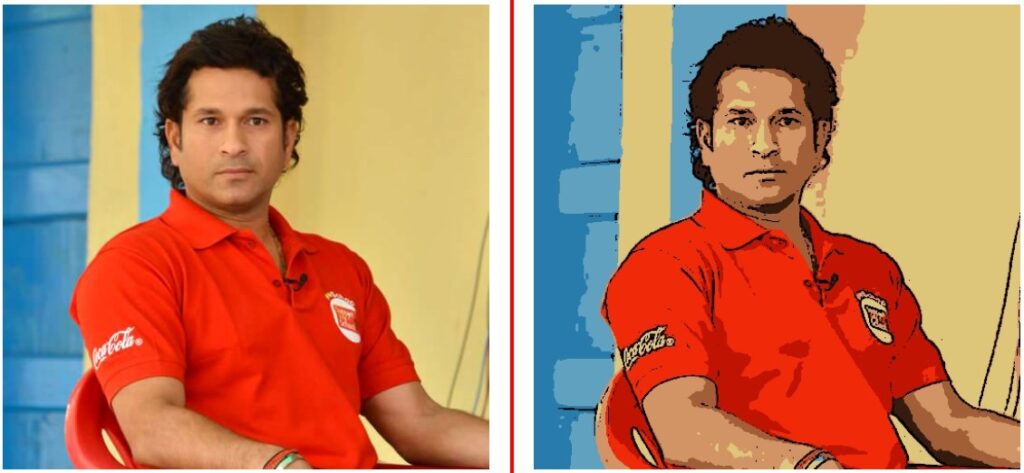
Results of detail enhancing filter
As we can see the result of detail enhancing filter i.e., the image on the right side is much sharper and enhanced in comparison to original image.
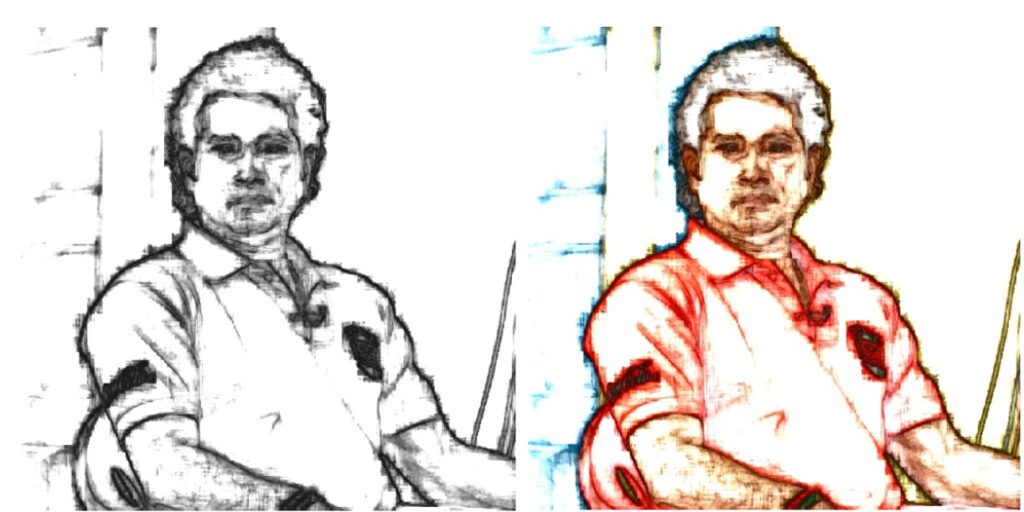
Next filter we will be using in the app is pencil sketch effect filter that is also available in opencv.
2. Pencil Sketch Filter
This filter produces an output which converts the image into pencil sketch and in this filter we get two types of images one is grey scale pencil sketch while the other one is colored pencil sketch.
The code for pencil sketch is shared below.
img = cv2.imread('image1.jpg')
imout_gray, imout = cv2.pencilSketch(img, sigma_s=60, sigma_r=0.07, shade_factor=0.05)
The parameters in pencil sketch filter is same as detail enhancing filter except one additional parameter i.e., shade factor. Its value ranges between 0 to 1. The higher the value the brighter the image. This parameter is used for scaling the image intensity.
Results of Pencil Sketch filter
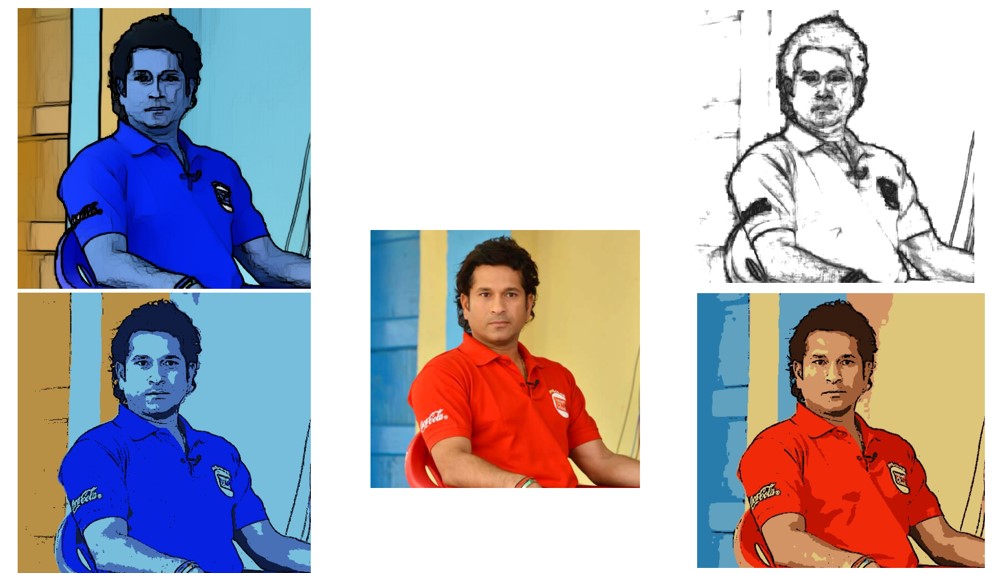
Next we will be converting the image into cartoon.
3. Cartoon Effect
For converting the image to cartoon, we have to perform multiple transformations. First we will transform the image to grayscale.
# Convert the input image to gray scale
gray = cv2.cvtColor(img, cv2.COLOR_BGR2GRAY)
In the next step, we will retrieve the edges and then highlight them using adaptive threshold filter. In this we will pass greyscale image obtained from step 1. The threshold value represents the difference of mean of the neighborhood pixel values and the constant C. Thresh_binary is the type of threshold applied, and the remaining parameters represents the size of the block.
# Perform adaptive threshold for retrieving edges
edges  = cv2.adaptiveThreshold(gray, 255, cv2.ADAPTIVE_THRESH_GAUSSIAN_C, cv2.THRESH_BINARY, 9, 8)
In the next step we will perform color quantization. Color quantization is the process of reducing the number of colors in the original image. But to perform color quantization the input data need to be in a single column. So for that we will be reshaping the image to a single column. Next we will use k-means clustering and for that we will using cv2.kmeans() function. Here parameter k represents number of clusters, whereas criteria represents iteration termination criteria. This function returns three output but we will be focusing only on center of the clusters only.
# Defining input data for clustering
    data = np.float32(img).reshape((-1, 3))

# Defining criteria
criteria = (cv2.TERM_CRITERIA_EPS + cv2.TERM_CRITERIA_MAX_ITER, 20, 1.0)

# Applying cv2.kmeans function
_, label, center = cv2.kmeans(data, k, None, criteria, 10, cv2.KMEANS_RANDOM_CENTERS)
center = np.uint8(center)

 # Reshape the output data to the size of input image
result = center[label.flatten()]
result = result.reshape(img.shape)
Next we will reshape the output image into original image size and further we will smoothen the resulting image using median blur technique.
In the last step we will combine this blurred image with edges in the form of masks using bitwise and operation in opencv.
# Smooth the result
blurred = cv2.medianBlur(result, 3)

# Combine the result and edges to get final cartoon effect
cartoon = cv2.bitwise_and(blurred, blurred, mask=edges)
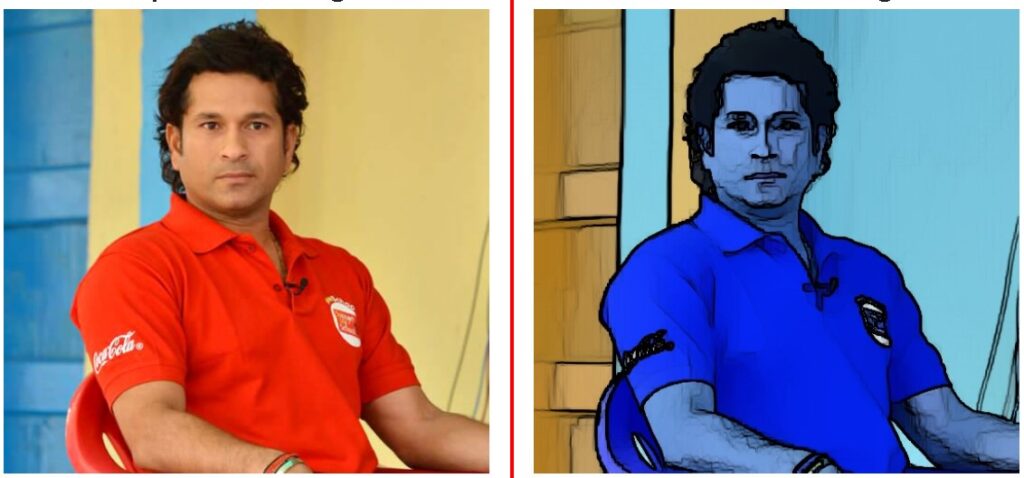
Results of Cartoon Effect
4. Water Color
In this effect, we will use open cv stylize method to give water color effect to the input image.
# Convert the input image to gray scale
img = cv2.cvtColor(img, cv2.COLOR_BGR2RGB)

# stylization of image
img_style = cv2.stylization(img, sigma_s=150,sigma_r=0.25)
Before using stylization method, we have to convert the image to RGB format as the default color palette after reading the image is BGR.
Results of Water Color Effect
As we have seen all the functionalities which we will be employing in our app, now we will move towards building a flask based web app which allows user to upload any image and on clicking stylize button it can convert original image into different effects which we have demonstrated earlier in this article.
Flask based web app
So, before building a web app we first have to create a virtual environment so that it should not effect your current python environment.
conda create -n cartoonenv python=3.8
So, by executing above command a virtual environment will be created with the name cartoonenv and python version 3.8
After creating environment we have to navigate to web app folder named CARTOONIZER and then we have to activate the environment.

After activating the environment we have to install all the required libraries using the command “pip install -r requirements.txt“.
The content of the requirements.txt file is shown below.
Next we will see the folder structure of our flask web app.
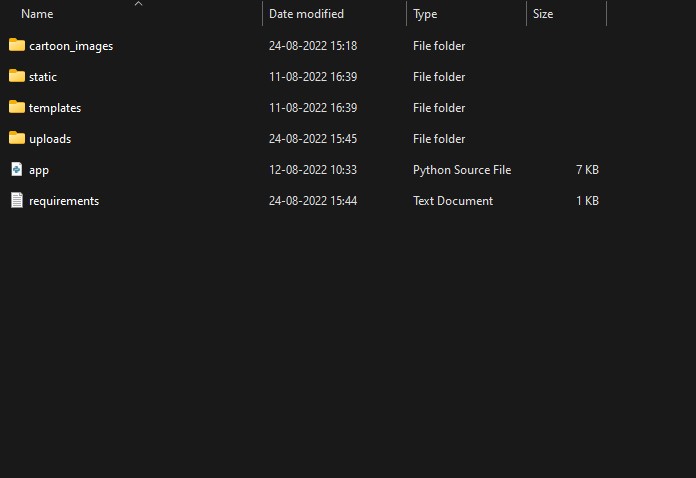
So, in this we have two basic folders that flask app requires i.e., static and templates folder. The static folder contains basic CSS files, images for giving style while designing the user interface of the web app whereas templates folder contains all the HTML pages of the web app.
Apart from that we have tow other folders i.e., cartoon_images where the output of image stylization will be stored whereas uploads folder contains those images which will be uploaded using uploader for applying image stylization.
Now we will look into the code of HTML pages under templates folder. So the first page is base.html. So in this we can observe that we have used bootstrap css for giving basic style and navbars for creating basic menus for the web app.
<html lang="en">

<head>
    <meta charset="UTF-8">
    <meta name="viewport" content="width=device-width, initial-scale=1.0">
    <meta http-equiv="X-UA-Compatible" content="ie=edge">
    <title>Cartoonizer Web App</title>
    <link href="https://cdn.bootcss.com/bootstrap/4.0.0/css/bootstrap.min.css" rel="stylesheet">
    <script src="https://cdn.bootcss.com/popper.js/1.12.9/umd/popper.min.js"></script>
    <script src="https://cdn.bootcss.com/jquery/3.3.1/jquery.min.js"></script>
    <script src="https://cdn.bootcss.com/bootstrap/4.0.0/js/bootstrap.min.js"></script>


    <style>

        .float-container {
            border: 3px solid #fff;
            padding: 20px;
        }

        .float-child {
            width: 50%;
            float: left;
            padding: 20px;
            border: 2px solid red;
        }

    .a {
            text-align: center;
          }
    </style>
</head>

<body>
    <nav class="navbar navbar-expand-lg navbar-light bg-light">
        <button class="navbar-toggler" type="button" data-toggle="collapse" data-target="#navbarTogglerDemo03" aria-controls="navbarTogglerDemo03" aria-expanded="false" aria-label="Toggle navigation">
          <span class="navbar-toggler-icon"></span>
        </button>
        <a class="navbar-brand" href="#">Cartoonizer Web App</a>

        <div class="collapse navbar-collapse" id="navbarTogglerDemo03">
          <ul class="navbar-nav mr-auto mt-2 mt-lg-0">
            <li class="nav-item active">
              <a class="nav-link" href="/">Home <span class="sr-only">(current)</span></a>
            </li>


          </ul>
          <form class="form-inline my-2 my-lg-0">
            <input class="form-control mr-sm-2" type="search" placeholder="Search" aria-label="Search">
            <button class="btn btn-outline-success my-2 my-sm-0" type="submit">Search</button>
          </form>
        </div>
      </nav>
    <div class="container">
        <div id="content" style="margin-top:2em">{% block content %}{% endblock %}</div>
    </div>
</body>

</html>
Next we have used block content inside the container div so that we can populate the prediction within this div by extending the base.html in index.html and predict.html pages for giving uniform design without explicitly coding design part in these pages independently.
The home page of our web app is index.html where we will actually upload the image for stylization and also choose which stylization we want for our uploaded image. The code for index.html is given below.
{% extends "base.html" %} {% block content %}
<h2></h2>
<div>
<form id="upload-file" action="/predict" method="POST" enctype="multipart/form-data">
<center> {% for message in get_flashed_messages() %}
<div class="alert alert-danger alert-dismissible fade show" role="alert">
{{ message }}
<button type="button" class="close" data-dismiss="alert" aria-label="Close">
<span aria-hidden="true">×</span>
</button>
</div>
{% endfor %}
</center>
<div class="card">
<div class="card-header">
<h4> Upload Image </h4>
</div>
<div class="card-body">
<h5 class="card-title">Browse Image</h5>
<p class="card-text"><input type="file" id="file" name="file" ></p>
<p>
<label class="my-1 mr-2" for="inlineFormCustomSelectPref">Choose Style</label>
<select class="custom-select my-1 mr-sm-2" id="inlineFormCustomSelectPref">
<option selected>Choose...</option>
<option value="Style6">Image Enhancement</option>
<option value="Style1">Cartoon</option>
<option value="Style2">Water color</option>
<option value="Style5">Pastel color</option>
<option value="Style3">Pencil Sketch</option>
<option value="Style4">Pencil Color Sketch</option>
</select>
</p>
<input type="submit" class="btn btn-primary " name="submit" value="Stylize">
</div>
</div>
</form>
<div class="loader" style="display:none;"></div>
<h3 id="result">
<span> </span>
</h3>
</div>
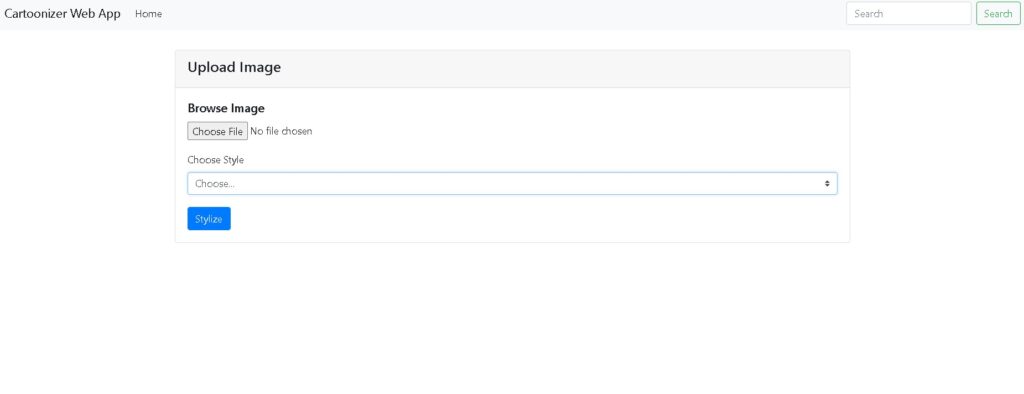
{% endblock %}The output of the web page is also shown in below image.
Next we will see the predict.html page code which is the output page of this web app.
{% extends "base.html" %} {% block content %}

<div class="float-container">

    <div class="float-child">
        <h2 class="a">Uploaded Image</h2>
      <div class="green"><img src="{{ url_for('upload_img', filename=file_name) }}" class="img-fluid"></div>
    </div>

    <div class="float-child">
        <h2 class="a">Cartoonized Image</h2>
      <div class="blue"><img src="{{ url_for('cartoon_img', filename=cartoon_file) }}" class="img-fluid"></div>
    </div>

  </div>

{% endblock %}
Next most important file is app.py where all the python code is residing.
The python code for the web app is shared below.
# coding=utf-8
import sys
import os, shutil
import glob
import re
import numpy as np
import cv2

# Flask utils
from flask import Flask,flash, request, render_template,send_from_directory
from werkzeug.utils import secure_filename


# Define a flask app
app = Flask(__name__, static_url_path='')
app.secret_key = os.urandom(24)

app.config['CARTOON_FOLDER'] = 'cartoon_images'
app.config['UPLOAD_FOLDER'] = 'uploads'


@app.route('/uploads/<filename>')
def upload_img(filename):

    return send_from_directory(app.config['UPLOAD_FOLDER'], filename)

@app.route('/cartoon_images/<filename>')
def cartoon_img(filename):

    return send_from_directory(app.config['CARTOON_FOLDER'], filename)


def cartoonize_1(img, k):

    # Convert the input image to gray scale
    gray = cv2.cvtColor(img, cv2.COLOR_BGR2GRAY)

    # Peform adaptive threshold
    edges  = cv2.adaptiveThreshold(gray, 255, cv2.ADAPTIVE_THRESH_GAUSSIAN_C, cv2.THRESH_BINARY, 9, 8)

    # cv2.imshow('edges', edges)

    # Defining input data for clustering
    data = np.float32(img).reshape((-1, 3))


    # Defining criteria
    criteria = (cv2.TERM_CRITERIA_EPS + cv2.TERM_CRITERIA_MAX_ITER, 20, 1.0)

    # Applying cv2.kmeans function
    _, label, center = cv2.kmeans(data, k, None, criteria, 10, cv2.KMEANS_RANDOM_CENTERS)
    center = np.uint8(center)
    # print(center)

    # Reshape the output data to the size of input image
    result = center[label.flatten()]
    result = result.reshape(img.shape)
    #cv2.imshow("result", result)

    # Smooth the result
    blurred = cv2.medianBlur(result, 3)

    # Combine the result and edges to get final cartoon effect
    cartoon = cv2.bitwise_and(blurred, blurred, mask=edges)

    return cartoon

def cartoonize_2(img):

    # Convert the input image to gray scale
    img = cv2.cvtColor(img, cv2.COLOR_BGR2RGB)

    # stylization of image
    img_style = cv2.stylization(img, sigma_s=150,sigma_r=0.25)

    return img_style

def cartoonize_3(img):

    # Convert the input image to gray scale


    # pencil sketch  of image

    imout_gray, imout = cv2.pencilSketch(img, sigma_s=60, sigma_r=0.07, shade_factor=0.05)

    return imout_gray

def cartoonize_4(img):

    # Convert the input image to gray scale


    # pencil sketch  of image

    imout_gray, imout = cv2.pencilSketch(img, sigma_s=60, sigma_r=0.07, shade_factor=0.05)

    return imout

def cartoonize_5(img, k):

    # Convert the input image to gray scale
    img1 = cv2.cvtColor(img, cv2.COLOR_BGR2RGB)
    img1g=cv2.cvtColor(img1,cv2.COLOR_RGB2GRAY)
    img1b=cv2.medianBlur(img1g,3)
    #Clustering - (K-MEANS)
    imgf=np.float32(img1).reshape(-1,3)
    criteria=(cv2.TERM_CRITERIA_EPS+cv2.TERM_CRITERIA_MAX_ITER,20,1.0)
    compactness,label,center=cv2.kmeans(imgf,k,None,criteria,10,cv2.KMEANS_RANDOM_CENTERS)
    center=np.uint8(center)
    final_img=center[label.flatten()]
    final_img=final_img.reshape(img1.shape)
    edges=cv2.adaptiveThreshold(img1b,255,cv2.ADAPTIVE_THRESH_MEAN_C,cv2.THRESH_BINARY,3,3)
    final=cv2.bitwise_and(final_img,final_img,mask=edges)

    return final

def cartoonize_6(img):

    # Convert the input image to gray scale


    # pencil sketch  of image

    dst = cv2.detailEnhance(img, sigma_s=10, sigma_r=0.15)

    return dst


@app.route('/', methods=['GET'])
def index():
    # Main page
    return render_template('index.html')


@app.route('/predict', methods=['GET', 'POST'])
def predict():
    if request.method == 'POST':
        # Get the file from post request

        f = request.files['file']
        style = request.form.get('style')
        print(style)
        # Save the file to ./uploads
        basepath = os.path.dirname(__file__)
        file_path = os.path.join(
            basepath, 'uploads', secure_filename(f.filename))

        f.save(file_path)
        file_name=os.path.basename(file_path)

        # reading the uploaded image

        img = cv2.imread(file_path)
        if style =="Style1":
            cart_fname =file_name + "_style1_cartoon.jpg"
            cartoonized = cartoonize_1(img, 8)
            cartoon_path = os.path.join(
                basepath, 'cartoon_images', secure_filename(cart_fname))
            fname=os.path.basename(cartoon_path)
            print(fname)
            cv2.imwrite(cartoon_path,cartoonized)
            return render_template('predict.html',file_name=file_name, cartoon_file=fname)
        elif style =="Style2":
            cart_fname =file_name + "_style2_cartoon.jpg"
            cartoonized = cartoonize_2(img)
            cartoon_path = os.path.join(
                basepath, 'cartoon_images', secure_filename(cart_fname))
            fname=os.path.basename(cartoon_path)
            print(fname)
            cv2.imwrite(cartoon_path,cartoonized)
            return render_template('predict.html',file_name=file_name, cartoon_file=fname)
        elif style=="Style3":
            cart_fname =file_name + "_style3_cartoon.jpg"
            cartoonized = cartoonize_3(img)
            cartoon_path = os.path.join(
                basepath, 'cartoon_images', secure_filename(cart_fname))
            fname=os.path.basename(cartoon_path)
            print(fname)
            cv2.imwrite(cartoon_path,cartoonized)
            return render_template('predict.html',file_name=file_name, cartoon_file=fname)
        elif style=="Style4":
            cart_fname =file_name + "_style4_cartoon.jpg"
            cartoonized = cartoonize_4(img)
            cartoon_path = os.path.join(
                basepath, 'cartoon_images', secure_filename(cart_fname))
            fname=os.path.basename(cartoon_path)
            print(fname)
            cv2.imwrite(cartoon_path,cartoonized)
            return render_template('predict.html',file_name=file_name, cartoon_file=fname)
        elif style=="Style5":
            cart_fname =file_name + "_style5_cartoon.jpg"
            cartoonized = cartoonize_5(img,5)
            cartoon_path = os.path.join(
                basepath, 'cartoon_images', secure_filename(cart_fname))
            fname=os.path.basename(cartoon_path)
            print(fname)
            cv2.imwrite(cartoon_path,cartoonized)
            return render_template('predict.html',file_name=file_name, cartoon_file=fname)
        elif style=="Style6":
            cart_fname =file_name + "_style6_cartoon.jpg"
            cartoonized = cartoonize_6(img)
            cartoon_path = os.path.join(
                basepath, 'cartoon_images', secure_filename(cart_fname))
            fname=os.path.basename(cartoon_path)
            print(fname)
            cv2.imwrite(cartoon_path,cartoonized)
            return render_template('predict.html',file_name=file_name, cartoon_file=fname)
        else:
             flash('Please select style')
             return render_template('index.html')


    return ""

if __name__ == '__main__':
        app.run(debug=True, host="localhost", port=8080)
So, now we will run this web app by executing command python app.py in the terminal. After executing the command the web app will be available on localhost:8080
The full code demonstrated in this video is available in this repo.
The below video shows the functionality of the web app once it is available on localhost.