Shiny is a very popular framework for building an interactive web app in the R language. It was developed and launched by RStudio a decade ago for R users in July 2012. Shiny was developed with the aim to help data scientists, data analysts, and other data-savvy who are not well versed in the development of user interfaces. By using shiny one can quickly showcase their machine learning model results to their clients/ team members, and can build data-intensive dashboards in the form of interactive graphs with an extremely interactive user interface.

On July 28, 2022, R studio’s CEO Joe Cheng announced at the RStudio conference that Shiny, the single main package available in R will now be available for python developers also. However, he pointed out that the framework is still in the development phase so it’s unstable and can not be used for building production-grade apps. You can visit RStudio’s official website for shiny for python here.
In this article, we will demonstrate how we can build a shiny-based web app in python by working on real time project i.e., Early Stage Diabetes Prediction using a Machine Learning approach.
So, in this article, we will not be covering the model building and data processing part, if you want to follow it you can visit our previous article here.
To start building a shiny-based web app, first, create a new directory as shown below:
mkdir Shiny_webapp
cd Shiny_webapp
Next, we will create a new virtual environment using venv or conda as shown below:
# Create a virtual environment in the .venv subdirectory
python3 -m venv venv

# Activate the virtual environment
source venv/bin/activate

                       OR

conda create -n shinyenv python=3.8
After creating a virtual environment, now we have to install all the necessary packages inside our virtual environment. As shiny is in the development stage It is also a good idea to upgrade pip and install wheel:
pip install --upgrade pip wheelNow, you need to install the shiny and htmltools packages, which are not yet on the official PyPI repository, but can be installed from RStudio’s PyPI repo.
pip install shiny

pip install --upgrade shiny htmltools
As we have installed the basic libraries required for building a shiny app. Now we will be building a default app with basic functionality which we will customize in a later part.
In the same directory and within the virtual environment, execute the below command to create a basic default app in shiny.
shiny create .The above command will create a basic Shiny app in the current directory with a file named app.py.
To run the app, you have to execute the below command from the terminal:
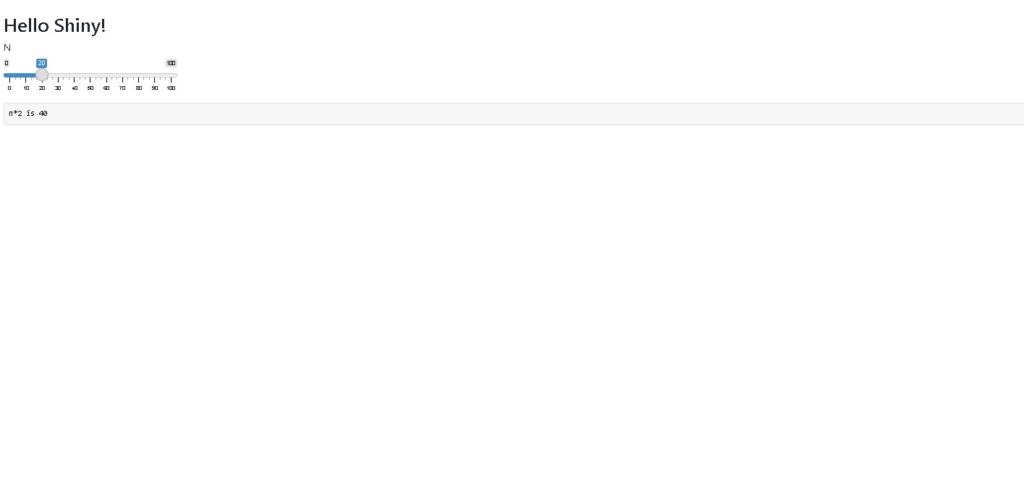
shiny run --reload app.pyAfter running the above command the app will run on 127.0.0.1:8000 by default and after visiting this URL you may see a basic web app as shown below.
Now, we have to customize our web app for the use case of early diabetes detection. So we will start by first building the user interface part of the web app.
The code for building the UI part of the web app is shared below:
#importing libraries

from shiny import App, render, ui,reactive
import numpy as np
import joblib
import pandas as pd
from sklearn.preprocessing import MinMaxScaler

# UI section starts from here
app_ui = ui.page_fluid(
    ui.markdown(
        """
        ## Early Diabetes Detection Shiny Web App
        """
    ),
    ui.layout_sidebar(
        ui.panel_sidebar(ui.input_select("polyuria", "Polyuria", {0: "No", 1: "Yes"}),
                         ui.input_select("polydipsia", "Polydipsia", {0: "No", 1: "Yes"}),
                         ui.input_slider("age", "Age in years", 0, 100, 20),
                         ui.input_select("gender", "Gender", {0: "Male", 1: "Female"}),
                         ui.input_select("partial_paresis", "Partial Paresis", {0: "No", 1: "Yes"}),
                         ui.input_select("sudden_weight_loss", "Sudden Weight Loss", {0: "No", 1: "Yes"}),
                         ui.input_select("irritability", "Irritability", {0: "No", 1: "Yes"}),
                         ui.input_select("del_healing", "Delayed Healing", {0: "No", 1: "Yes"}),
                         ui.input_select("alopecia", "Alopecia", {0: "No", 1: "Yes"}),
                         ui.input_select("itching", "Itching", {0: "No", 1: "Yes"}),
                         ui.input_action_button("btn", "Predict"),
                         ),

        ui.panel_main(ui.markdown(
        """
        ## Model Output
        """
    ),
                      ui.output_text_verbatim("txt", placeholder=True),),
    ),
)

## server section

def server(input, output, session):
    pass

app = App(app_ui, server)
After adding the above code, the app will change to a professional web app like the below:
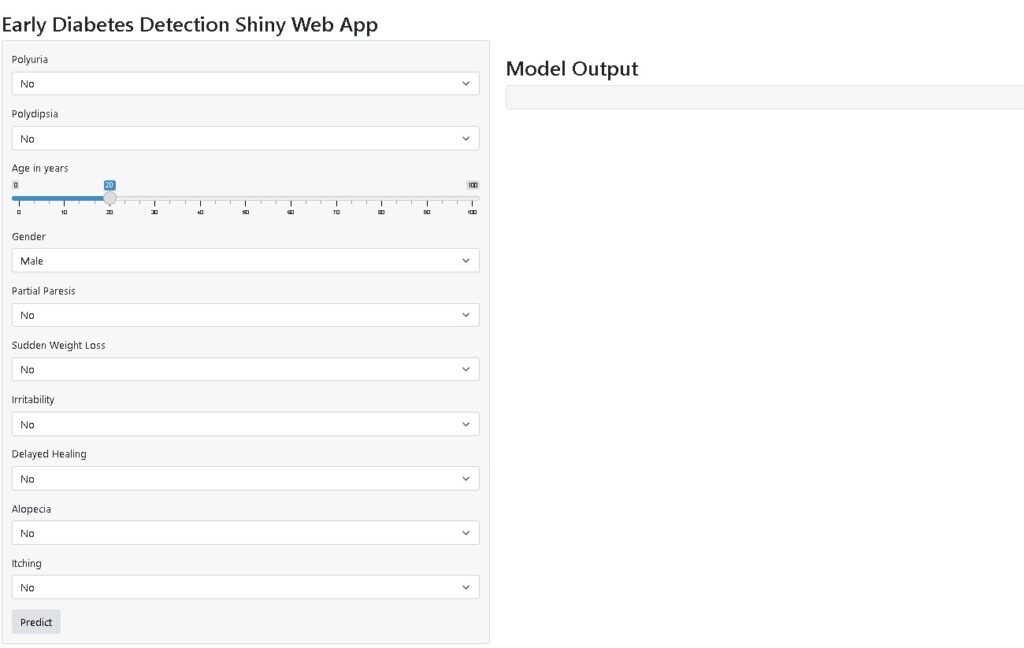
From the code, we can see we have used different input and output components for designing this web app.
First, we have created app_ui part in which we have passed ui.page_fluid which is similar to container fluid in HTML. Under this div, we usually keep all the HTML elements similarly in the shiny app also we will keep all the input and output components within ui.page_fluid.
As our web app is divided into two main divs that are left sidebar and the main Model Output div. So for designing the left sidebar, we have to keep every input component within ui.layout_sidebar. Further, under the layout sidebar, we have to wrap all the input components in ui.panel_sidebar. As we can observe that in our app we have total 9 out of 10 features are drop-down-based selection features whereas only one feature is numeric.
For selection drop-down we have to use ui.input_select(“polyuria”, “Polyuria”, {0: “No”, 1: “Yes”}) where “polyuria” is the input variable name which we will be referring to during the prediction phase, “Polyuria” is the label for drop-down and dictionary {0: “No”, 1: “Yes”} is used for mapping visible value in drop-down i.e., No to 0 which is the internal value used in model building part for that feature.
To build a numeric slider we have to use ui.input_slider(“age”, “Age in years”, 0, 100, 20), here “age” is the input variable “Age in years” is a label and 0,100 to assign a starting and endpoint value to slider whereas 20 denotes default value.
If you want to explore more input and output components in shiny for python visit here.
Now, we have to code the model prediction part and for that, we have to use the server section in the app.py file. But before writing the model prediction function we have to load our model and scaler function i.e., min-max scaler for normalizing age feature. So for that, we have to create one folder named model in the root directory and we have to put both the logistic regression model and min-max scaler’s .pkl files inside it.
The full code of the web app is shared below.
from shiny import App, render, ui,reactive
import numpy as np
import joblib
import pandas as pd
from sklearn.preprocessing import MinMaxScaler
#setting model path
MODEL_PATH = 'model/logreg.pkl'
NORM_PATH = 'model/minmax.pkl'
#loading model
model = joblib.load(MODEL_PATH)
#loading min-max scaler
normalizer = joblib.load(NORM_PATH)
assert isinstance(normalizer, MinMaxScaler)
normalizer.clip = False # add this line to avoid error related to clip
# UI section starts from here
app_ui = ui.page_fluid(
ui.markdown(
"""
## Early Diabetes Detection Shiny Web App
"""
),
ui.layout_sidebar(
ui.panel_sidebar(ui.input_select("polyuria", "Polyuria", {0: "No", 1: "Yes"}),
ui.input_select("polydipsia", "Polydipsia", {0: "No", 1: "Yes"}),
ui.input_slider("age", "Age in years", 0, 100, 20),
ui.input_select("gender", "Gender", {0: "Male", 1: "Female"}),
ui.input_select("partial_paresis", "Partial Paresis", {0: "No", 1: "Yes"}),
ui.input_select("sudden_weight_loss", "Sudden Weight Loss", {0: "No", 1: "Yes"}),
ui.input_select("irritability", "Irritability", {0: "No", 1: "Yes"}),
ui.input_select("del_healing", "Delayed Healing", {0: "No", 1: "Yes"}),
ui.input_select("alopecia", "Alopecia", {0: "No", 1: "Yes"}),
ui.input_select("itching", "Itching", {0: "No", 1: "Yes"}),
ui.input_action_button("btn", "Predict"),
),
ui.panel_main(ui.markdown(
"""
## Model Output
"""
),
ui.output_text_verbatim("txt", placeholder=True),),
),
)
## server section -> model prediction
def server(input, output, session):
# The @reactive.event() causes the function to run only when input.btn is
# invalidated.
@reactive.Effect
@reactive.event(input.btn)
def _():
# Input data
testset = pd.DataFrame([[input.polyuria(),input.polydipsia(),input.age(),input.gender(),input.partial_paresis(),input.sudden_weight_loss(),input.irritability(),input.del_healing(),input.alopecia(),input.itching()]],columns=['Polyuria', 'Polydipsia', 'Age', 'Gender', 'partial paresis',
'sudden weight loss', 'Irritability', 'delayed healing', 'Alopecia',
'Itching'],dtype=float)
# normalize age variables
testset[['Age']] =normalizer.transform(testset[['Age']])
# getting prediction
prediction_proba = model.predict_proba(testset)
output1 = round(prediction_proba[0, 1] * 100, 2)
pred = str(output1) + "%"
# This output updates only when input.btn is invalidated.
@output
@render.text
@reactive.event(input.btn)
def txt():
return f'Probability of Diabetes is: "{pred}"'
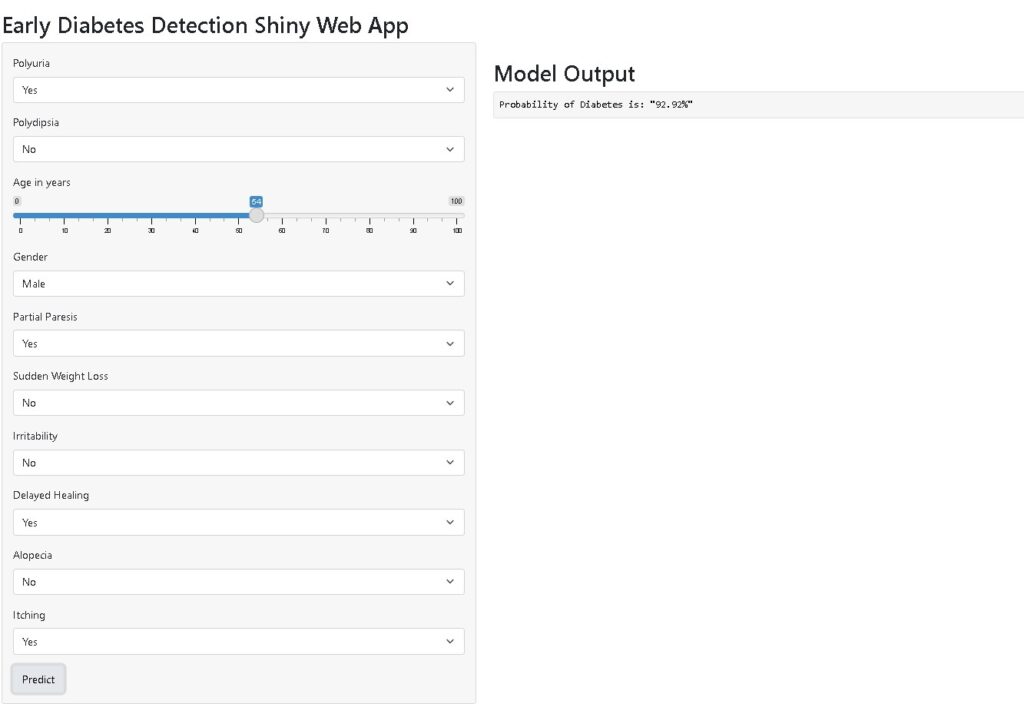
app = App(app_ui, server)After reloading the app you can test the model by changing different input variables and the model output will show the probability of diabetes based on the selection of input features. Based on the below input parameters the model is showing a 92.92% probability of diabetes.
The full source code demonstrated in this article is available in this Git repo
Conclusion
So, in this article, we have developed an early diabetes detection web app using shiny for python framework. For prediction, we have used our base model i.e., logistic regression which has given around 97% accuracy and 96.87% recall.
I hope this article will help you in building more machine learning-based web apps using shiny in python.
You can also see below a detailed video demonstrating the whole code and development of the web app.
hello sir,
thanks for your video regarding shiny for python video on youtube.
while encountering same i didn’t understood select model path and normalizer path mentioned in the video.
hope you take your time to resolve my issue
Hi Nilesh, first of all thanks for liking our content. Model path and normalizer path are actually used because we want to use our trained model which we already saved with .pkl extention. So in that step we are setting the relative path of both the saved model and normalizer so that we can use them in prediction
Hi Nilesh, first of all thanks for liking our content. Model path and normalizer path are actually used because we want to use our trained model which we already saved with .pkl extention. So in that step we are setting the relative path of both the saved model and normalizer so that we can use them in prediction